About Knowledge Clips
To start production on your own knowledge clip, contact the educational media team through [email protected] for an intake meeting!
What are knowledge clips?
Educational videos or knowledge clips offer an alternative way to educating students. This is done by explaining one specific topic, instruction or concept to the student in a single video or clip. These knowledge clips typically last 5-7 minutes. Advantages of these knowledge clips could be:
- Students can access instruction about a topic or skill anytime, anyplace, anywhere;
- Students can receive specific instructions in a more engaging way than for instance via written instruction;
- Students can get one-on-one instruction about a difficult topic;
- Students can view only the parts of the topic that they did not yet understand.
- Lecturers can save time by investing in the production of knowledge clips, since you can use them multiple times and for different tasks and activities.
Other functions of knowledge clips are to:
- Make students enthusiastic about a topic by viewing the real-world applications of the course material
- Prepare students for an educational meeting
- Show and explain topics from a different perspective. Video offers options that are not possible in a traditional classroom setting.
- ...
Recording a knowledge clip
The Educational Media team helps you record your knowledge clip in the studio in the Dragonfly studio in Atlas. To kick off the process, send an email to [email protected] or book an intake meeting directly via https://outlook.office.com/book/[email protected]/?ae=true&login_hint
Watch the video below to get a feeling of what a knowledge clip can be like!
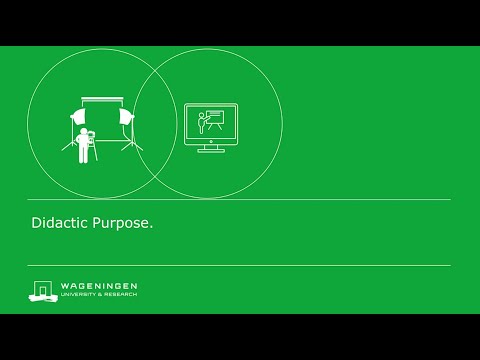
What is the didactic purpose of your video?
Whether you are designing a complete online master program, or you only want to produce a single knowledge clip, you should always consider the main goal of a video. There are mainly four didactic purposes of educational video, which are listed below.
- Focussing attention
- Acquiring
- Processing
- Feedback
The video below gives some examples of these four purposes.
Focussing attention
You are designing a course or video series and try to do this in a logical manner. A clear structure and linking information will improve the effectiveness of learning and will keep the audience on track. Therefore, focussing attention to what is important, is one of the key aspects in education.
In an educational video, focussing attention can be done by giving a clear introduction and going over a course guide or schedule for example. See the video above for a good example recorded in our green room studio.
Acquiring
Teaching new concepts, theories, methods and skills, all fall under the purpose of acquiring. This is where the real new information is offered to your audience. In a video this has to be done in a clear, step by step manner. An often-made mistake is that a teacher tries to put too much information in one single clip. Explaining one abstract concept at a time, ensures that students can absorb the information that you just have offered and gives them the opportunity to process it.
Processing
Connecting new information, concepts and methods to real world applications and examples, will improve the understanding of the topic drastically. There are many options to use educational videos for processing.
Feedback
To move information from the short-term memory to the long-term memory, the information should be used more than once. Summarising or discussing what is learned in previous teaching activities and videos, is a good way to do this. There are many ways in which you can do this in an educational video such as answering FAQs as shown in the video above.
Once you have decided that you want to make an educational video, you will probably have a good idea of what message you want to deliver. Choosing the right setting or video format for how you will present the information, is key in reaching this goal. Please bear in mind that the different types of video require different amounts of time required from you as a lecturer, and from the Educational Media team.
The 5 main types of knowledge clips at the WUR
We can roughly distinguish five different types of knowledge clips: a studio recording, a screen recording, a practical instruction, a location shoot and a tailored video. They all have their pros and cons and within these different types there is more room to specify for your goal. Please do not hesitate to contact one of our instructional designers to discuss the possibilities for your course.
In the video below, the five different types are illustrated.
Studio Recordings
A studio recording is the most common type for educational video. The preparation is relatively short and easy. You start with an intake and, if it is your first recording, follow an online training with feedback from our Instructional Designer. After booking a slot in the agenda, you will be guided through the recording by one of the studio operators. Because the videos are produced as ''one takers'' that do not require post editing, the video will be available the same day. You can use it immediately.
We have a couple of formats to choose from. To choose between any of the formats, it is importat to match your personal style, your personal preference, but also to match other knowledge clips within your course or even your department. Also, you can ask the following questions:
- What is the most important to focus on in this clip, the teacher or the PowerPoint or the procedure?
- Do you want the text size and slides to be big enough for mobile devices? (Full screen or screen recording)
- Do you want to spend a little more preparation time to make the slides visually engaging and maybe even interactive with yourself? (Choose a full screen setting).
To make the videos of the WUR as uniform and recognizable as possible, some elements are included in all videos. We make use of standard WUR bumpers (intro and outro animation) which contains the WUR logo. After a few seconds of recording, the name and title of the presenter will appear, which makes it obsolete to introduce oneself.
The formats you can choose from are:
- The Switcher: Switching between slides and presenter
- The Weatherman: Presenter in front of fullscreen slides (16x9)
- The Classic: Presenter next to slides (4x3)
- The Minimalist: Presenter in front of a single background
- The Late Night Show: Presenter with table and small slides.
In addition it is possible to present with more then one presenter, you can use props or a table, insert a fullscreen video, use a second camera or use a topcamera to film certain actions from above. It is important to let us know when you want to use any of these additional options.
If what you need doesn't fit one of the formats, we can customize the recording to your wishes.
Location Shoot
Filming on location has advantages which might make it the perfect choise for your video. You can film in a relevant setting, show how something works in real life and engage your students by offering an original video.
We devided the location shoots in four genres:
1. Practicum Clip, for example in a lab
Showing practical instructions in a pre-recorded video has certain advantages over the traditional in class way. You can prepare everything in advance and are sure the final demonstration will show the instructions as they were supposed to. You have more time and attention to devote to the practical itself. You can use the video many times and students can re-watch if they did not follow a specific part the first time.
2. Field Clip
You can demonstrate something outside and show close-ups of the topic you are talking about.
3. Interview
Have an interview in a real life setting. Either the final video will highlight the most important parts in a short video, or you get a longer, more in depth, video with the full interview.
4. One-on-one Conversation
You can have a unscripted discussion with someone. This can be usefull for example for Frequently Asked Questions or to go in depth about a topic with an expert.
Videos in other settings or locations than the greenroom studio, require more planning and recording time and effort. A lot is possible, but this should be checked and planned well in advance with the Educational Media team. Don't worry! We will see what is possible and guide you through the entire process.
5. Creating a virtual tour
You can use a virtual tour to 'replace' an excursion or field trip, as is done in this showcase. You can also use a virtual tour to show others a specific location, such as a lab, a greenhouse or a recording studio. For a more detailed explanation go to: Creating a virtual tour
Screencast/Podcast
In our Screencast/Podcast Studio you can record a screencast or podcast with high quality microphones, the software Camtasia and a webcam.
A screencast is a recording of your screen. This is easy to make and most suitable to explain procedures or programs on a computer.
You can create a podcast with up to three speakers.
Animation
Animation is a great tool for educational videos. The possibilities are endless, but in we short offer two types of animation:
- Additional Animation: Animations as addition to your video. For example: animated text, lines, graphs, icons or illustrations on top of your video. With this you can give more information or draw attention to a certain part.
- Full Animation: A fully animated video. Animation simplifies the topic and therefor makes it more clear. Besides you can show things that might not be possible to film.
Tailored videos
If you would like to produce a video that does not fit in the one of the standard formats above, this is often possible although planning, recording and editing takes more time and effort in this case. Contact the Educational Media team to discuss your ideas and the possibilities.
Indication of time
The indicated times that recording and preparations take are estimated and very significantly depending on your experience and the subject. The indications are per knowledge clip.
- Studio recording – 3 to 6 hours of preparation + 1 hour recording
- Screen recording – 1 to 4 hours of preparation + 2 hours recording
- Practical instructions – 3 to 6 hours of preparation + 3 hours recording + editing
- Location shoot – 3 to 8 hours of preparation + 3 hours recording + editing
- Tailored video – preparation up to 10 weeks + recording and editing 2 to 3 weeks
In order to have an easy and comfortable recording, a good preparation is key. Not only your story and performance are important. PowerPoint layout, copyright issues, metadata files and the proper clothing makes or breaks your recording.
Some important documents can be found in this document and the following checklist can be used to make sure you are all set to go.
- For a studio recording: Have I planned a timeslot in the studio agenda at least two weeks before the recording?
- Is my script written in the powerpoint notes to each slide? If there are animations within one slide, are there <click> placeholders to match?
- Did I fill in the metadata on the clip portal?
- Are my PowerPoint design and script checked and do the clicks in my text match the clicks in the PowerPoint?
- Did I think about Copyright issues and are they all fixed?
- Is my clothing all right? Good combination with background, no green, no small stripes or check patterns?
Documents
Below you can find some additional useful documents.
0 Comments
Add your comment